Working with Epoxy
General tips for epoxy use, aimed primarily at wooden boat building.
Epoxy Filleting
Contents
- Professional Epoxy Coating
- Mixing Epoxy
- Conservation of Epoxy
- Gluing Wood Together
- Clear Coating
- Filleting
- Fairing the Surface for Painting
- Applying Fibreglass Tape and Fabric
- Repairing Cracks and Scratches
Professional Epoxy Coating
Epoxy provides a virtually maintenance free finish and will ensure that the surface does not have to be re-coated for years. The epoxy can be varnished to give a high shine with the grain showing through. It can also be painted over.
The manufacturers instructions and recommendations should always be followed to ensure the best performance from the epoxy system. Work in a well ventilated area and avoid all contact with the skin and eyes.
Mixing Epoxy
Always wear disposable gloves and eye protection when working with epoxy since the parts contain potentially dangerous chemicals. Any spills of the epoxy we supply can be cleaned using soap and water or vinegar or, better still, an abrasive hand cleaner.
If you are using measuring pumps with your epoxy, make sure they are fitted correctly and primed so that they dispense the correct amount of resin and activator. Follow the instructions that accompany the pumps.
Measure the resin and activator into a mixing pot in the correct ratio (two parts resin to one part activator). Use one depression of each pump if you are using our 2:1 measuring pumps, or you can use a marked dip stick in a straight-sided pot.
Mix the two parts together thoroughly with a stick for 1 minute. Proper mixing is essential: most of the problems associated with epoxy are the result of not mixing well enough. When you need thickened epoxy, mix in your fillers only after the resin and activator are thoroughly mixed.
In general epoxy cures quicker the warmer it is kept. Try to keep the workshop above 15°C. The epoxy will cure below this temperature but it may take days. Warming the resin and hardener by keeping it near a source of gentle flame-free heat helps but do not attempt to warm it after mixing as it will probably set before it can be applied.
Conservation of Epoxy
Epoxy is both expensive and heavy so do not use more than is required for the boat.
- Plan the use of epoxy. If you have several small jobs try to do them at the same time so that a complete pot can be used with less wastage. If you are coating with thin epoxy try to have another job, such as filleting, waiting so that if there is any epoxy left it can be thickened and used rather than thrown away.
- Make only a small quantity. Mix a small quantity at a time. It is better to spend more time mixing than to ruin the finish by rushing to use an epoxy that is starting to harden. Epoxy is exothermic and the heat, in large volumes, further speeds the curing process.
- Use only enough epoxy to make a joint. Excess epoxy is merely squeezed out of the joint which is not only a waste but the cause of a lot of extra work sanding.
- Apply coats thinly. Apply coats to flat surfaces as thinly as possible to save sags and drips that have to be sanded off later.
- Only fill the weave of a fabric. Once the weave is full any additional epoxy merely adds weight rather than strength.
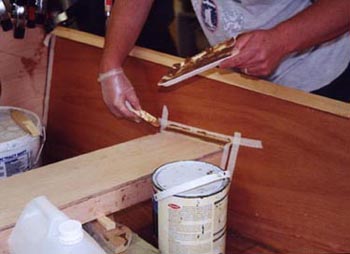
Gluing Wood Together
If correctly mixed and applied the epoxy forms a bond that is stronger than the wood itself. In positions where epoxy is likely to run or drip out of the joints then it is advisable to thicken it by mixing in microfibres and wood flour until it forms a paste. The colour of the epoxy can be matched to the colour of the wood by altering the ratio of microfibres to wood flour. If the mixture is too thin it will squeeze out of the joint when the clamps are applied, if it is too thick it will form an uneven bump in the wood. It should be made to a similar consistency as lemon curd, that is, it should run but not flow of its own accord. The application of gentle heat from a hair dryer greatly speeds up the curing time but beware of burning the wood. The longer the clamps or weights can be left in place the better: try to leave them at least 24 hours.
Cleaning hardened epoxy off joints is a tedious job. Avoid the work by wiping away as much epoxy as possible before it sets. For a really easy clean up job run some plastic sealing tape along the outside edges of the joint before applying the epoxy; when the epoxy is cured remove the tape along with the excess.
Clear Coating
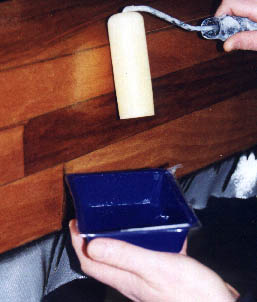
Epoxy Coating
The epoxy should be coated thinly and evenly on the wooden surfaces. The best way to achieve a good finish is to use a roller. Inexpensive sponge rollers are recommended. The most likely cause of problems is over brushing or rolling: the first pass gives the best finish. At least two coats should be applied. If the second coat is applied within the tack-free cure time of the first coat it will not be necessary to prepare the surface other than to ensure it is dust free. If more time has elapsed the surface will have to be lightly sanded to provide a key for the second coat. In damp conditions it may also be necessary to remove a bloom from the surface with soap and warm water.
The tack-free cure time varies between epoxy systems. Refer to the technical data sheet for the tack-free cure time of the system you are using.
Filleting
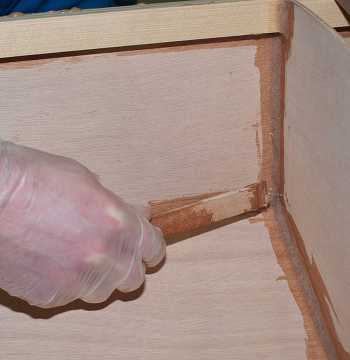
Epoxy Filleting
Large gaps in joints can be filled with a fillet of epoxy. For gaps up to 5 mm the epoxy can simply be pushed into the gap with a palette knife. Larger gaps are best made smaller by inserting wedges or fillets of wood then using epoxy. Filleting is recommended whenever water proof seals are required. To provide the bulk, wood flour and micro-fibres should be mixed with the epoxy. The colour of the epoxy can be matched to the colour of the wood by altering the ratio of microfibres to wood flour. Unfortunately, epoxy that seems thick in the pot often starts to sag after a few minutes as a fillet. If it sags return it to the pot and thicken a little more. Keep thickening until the epoxy stands up on the mixing stick like thick porridge.
Fillets should be concave in section and between 5 and 20 mm across. The width will depend upon the location. To achieve a smooth curve use a curved stick or tongue depressor. To obtain a smooth edge run some masking tape along each side of the joint where the fillet is to finish; make the fillet and after about an hour carefully remove the masking tape.
Fairing the Surface for Painting
To fill imperfections in the surface, especially at the edge of glass tape, slightly thickened epoxy can be used. The epoxy should be thickened with microfibres, phenolic micro-balloons or glass beads (glass beads should only be used above the waterline), to the point where it flows but only very slowly. It should be applied with care over the rough patch so that it does not form too thick a layer. When it is hard it should be sanded right off so that it only remains in the dips. Several applications with sanding between may be necessary but it is worth the effort for a perfect paint finish. It sometimes helps to stick plastic sealing tape over the wet epoxy when covering the ridge between the glass tape and the plywood.
The epoxy adds weight to the boat and affects its performance so as much of the filler epoxy as possible should be sanded off.
Especially formulated epoxy fillers can be purchased for this job. They are much more convenient to apply but they still require the same amount of sanding.
Applying Fibreglass Tape and Fabric
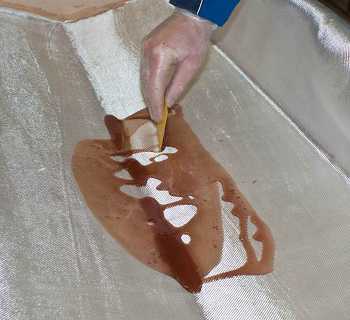
Using epoxy to apply fibreglass fabric
Covering joints or the hull in fabric set in epoxy makes a very strong joint and gives abrasion resistance to the boat.
Place the fabric or tape over the boat in the required position and gently smooth out all the wrinkles and rucks. Starting in the centre of the fabric gently brush un-thickened epoxy into the weave.
Use a brush or a squeegee to apply the epoxy to the fabric rather than a roller to avoid an uneven orange peel effect. Work towards the edges and ends of the fabric with brush strokes moving away from the centre. Great care should be taken to ensure that no rucks appear. If they do appear, smooth out the fabric from the uncoated end. Do not lift the fabric as it will not re-stick to the wood.
Only enough epoxy should be applied to make the fabric transparent, it is not necessary to completely fill the weave. If too much epoxy is applied the fabric will simply float off the wood.
Work with small quantities of epoxy at a time. This means more mixing but epoxy in large quantities in a pot goes off quickly and becomes difficult to work into the weave.
There should not be any white bumps in the finish - these will be weak spots. If they cannot be removed by moving the fabric they should be left to dry: later, make a small hole in the fabric and squeeze slightly thickened epoxy into the bubble. Repaired bubbles are not as strong as smoothed fabric but are better than leaving the empty bump. Try not to sand the bump so that the fabric is exposed when finishing the boat.
When the epoxy has started to gel fill the weave by applying another coat of epoxy.
Air bubbles can appear if the temperature of the wood rises after the coat has been applied but before it is set. These will appear as bubbles or as white bumps as mentioned previously but both are weak spots. To avoid these the temperature of the wood should be held constant or, at least, not rise during the curing process. The simplest way to achieve this is to heat the shed and wood before starting the job and then turn the heating off soon after the job is started. Starting the job in the evening or late afternoon rather than the morning is another way of avoiding the problem.
Repairing Cracks and Scratches
Cracks and scratches in the paint or varnish caused by wear and tear are unattractive but not usually harmful. However, if the damage has gone deeper than the epoxy layer then the wood is not being afforded any protection.
To repair the damage remove the paint or varnish in the area of the crack and lightly sand the epoxy until it has a matt white surface. After removing the dust the area can be coated with epoxy and then painted or varnished.